Being Cheap is Easy: kid food
Showing posts with label kid food. Show all posts

Fun Dips: Faux Cookie Dough

September 23, 2014


healthy snacks, cookie dough, chick peas, kid snacks
I have a major cookie dough addiction.  I know, I know...you're not supposed to eat raw eggs.  But I cannot resist dipping a spoon in any type of batter while baking.

When I came across this recipe in Family Fun magazine last April, I was hesitant.  Chickpeas? Oatmeal? That will NOT taste like cookie dough!  But I'm all about beans, I had to test this out with the girls. Let me tell you this: the girls LOVED this dip.  They think Mama has gone crazy and is letting them have an indulgent treat.  Little do they know, this is a HEALTHY cookie dough. Ha! #MomWin!

Here's what you need:
  • 1 can chickpeas, rinsed and drained (also labeled Garbanzo beans)
  • 6 tablespoons brown sugar
  • 1/4 cup natural peanut butter (or your favorite PB alternative)
  • 3 tablespoons old fashioned oats
  • 1 tablespoon milk
  • 2 teaspoons vanilla
  • 1/8 teaspoon salt
  • 1/8 teaspoon baking soda 
  • 1/2 cup mini chocolate chips
  • Dippers: apples, pretzels, fingers (hehe)
  1. In a mini chopper, mix together all ingredients except mini chips.
  2. Blend until smooth. Taste and add extra vanilla, if necessary. 
  3. Fold in mini chips.  Refrigerate for 30 minutes before serving. 
kid food, healthy snacks, cookie dough, chocolate chips, chickpeas, dips

Who's ready to try this? Have I gone crazy? Since it's apple season, might as well try this with your next snack! 


Healthy Breakfast: PB & Banana Oatmeal Muffins!

September 18, 2014

 
muffins, breakfast, fiber, healthy, kid friendly
I envisioned our mornings before kindergarten to be hectic, but they have been going so smoothly!  Well, we have a few breakdowns about clothes, but otherwise we have PLENTY of time to get ready.  We like to experiment with different breakfast foods and these muffins are always requested!

These breakfast muffins are filling and super healthy.  With oatmeal, Greek yogurt, bananas, peanut butter and a few chocolate chips, you'll send your kiddos off to school full AND happy.

I love to make 2-3 batches of these on a rainy day to fill up the freezer.  Simply bake them, freeze them on a cookie sheet and then put in baggies once frozen!  Or freeze the batter to bake later. I do grocery store demos on the weekends and I learned a cool new trick from the bakery: freeze the batter (with the cupcake liners) in the muffin tins.  Once frozen, pop out and keep them in a freezer bag.  When you are craving fresh muffins, pop the frozen muffins in the oven and bake for 10 or so minutes longer than normal.  Saves the time of making the batter! 

muffins, breakfast, healthy snack, kid friendly food
Here's what you need:
  • 2 mashed bananas (look for those markdown ones!)
  • 2 tablespoons canned pumpkin (not pumpkin pie filling!)
  • 2 tablespoons coconut oil 
    • NOTE: You can sub 4 tablespoons butter for pumpkin & coconut oil
  • 1/4 cup 0% Greek yogurt
  • 1/2 peanut butter or sunflower butter
  • 1 egg
  • 1 teaspoon vanilla extract
  • 2 tablespoons brown sugar
  • 1 teaspoon cinnamon
  • 1/2 teaspoon baking powder and baking soda
  • 1/4 cup flax seed (optional)
  • 3/4 cup flour
  • 3/4 cup oatmeal
  • 1/4 cup mini chocolate chips to sprinkle on top
I like to make little "kits" of the dry ingredients in mason jars to grab when I'm craving muffins. Total time saver.  ALSO a great gift!

Let's Bake! Yields about 12 muffins
  1. Preheat oven to 350.
  2. Mix all dry ingredients together, except chocolate chips, and set aside.
  3. In a mixer bowl, add banana, pumpkin and coconut oil. Mix on low until blended.  Add yogurt, peanut butter, vanilla and egg. 
  4. Slowly pour in dry ingredients. 
  5. Add batter to lined muffin pan and sprinkle with chocolate chips.
  6. Bake for 16-18 minutes. Don't overcook! 
    • They will look a bit dry, but let them cool. Pinky swear they are ah-mazing!
muffins, healthy snack, breakfast, kid friendly, cooking with Greek yogurt, coconut oil

What's your favorite healthy breakfast?

New Stonyfield Yogurt Pouches! {Giveaway!!} #StonyfieldYoGetter

April 30, 2014

This post was created in partnership with Stonyfield. All opinions are my own.

Liv spent a few days at Grandmas...she missed the boat on this photo op (and yogurt!)!
My kids fly through yogurt.  We basically have a whole shelf in the fridge dedicated to yogurt of all types: tubes, quarts, cups and now pouches!  When Gabby was a baby, they just started coming out with the cool pouches of baby food and I LOVED them! So convenient and mess free.  I was always bummed they never made yogurt for older kids that way.  UNTIL NOW!  Stonyfield has yogurt pouches in all of their kids varieties: YoBaby, YoToddler and YoKids.  All of them are organic and made with whole milk, perfect for your growing kiddos!

I find the pouches at Meijer, Family Fare and Target has 4 packs!  With coupons, they are the same price as any other variety.  We like to pack them for the car after school or the Y.  When it gets warmer, I will love to freeze these for a tasty treat at the beach or pool.  Even when we are home we hand them out for lunch because our kids make a MESS with their yogurt, this keeps the tables clean!


Would you like to try the pouches?  I have a giveaway for you!  One lucky winner will get 10 coupons for FREE yogurt!  Horray! 

Enter on the Rafflecopter below.
a Rafflecopter giveaway


NOTE: I do monitor all entries...if you have failed to complete a certain step, I will remove that entry.  Once the winner is drawn, they have 48 hours to respond to the email so keep your eyes peeled!  If there is no response, another winner will be drawn.


Can't wait to try the new Stonyfield pouches?  Here's a printable coupon for you!

You Gotta Try This #StonyfieldGreek {Super Fruity Banana Bread Recipe!}

January 27, 2014

#Stonyfield

Disclaimer: I am a part of the Stonyfield YoGetter Team.  I was provided yogurt to review.  All opinions (and tasty banana bread recipe!) are my own!

Last week, I came home to a HUGE box of Stonyfield Greek yogurt on my doorstep.  Although I was excited, I think Gabby was even more so.  I'm all about sharing, but the new flavor Cafe Latte was ALL MINE.  The twins love cherry, so I let them try out the new Black Cherry flavor.  Both are super tasty! I ate my Cafe Latte with some mini chocolate chips as a mid-morning snack. 

You've gotta try these new flavors! Aside from the two newbies, they have also enhanced the fan favorite flavors: strawberry, super fruit and blueberry. 

We are trying to be a little greener this year.  Our budget doesn't allow us to buy all organic/GMO free, but we do what we can.  What I love about Stonyfield yogurt is there are always sales AND coupons...it makes this tasty yogurt affordable!  I like Greek yogurt for breakfast and the girls prefer the regular tubs of yogurt, especially the French Vanilla or Banilla flavors.

You know what else is great to do with Greek yogurt? Make banana bread!  I altered my go-to recipe a bit to try out some coconut oil I have been experimenting with.  (I'm totally loving it so far...from stir fry to baking, it's been amazing!)

For this variety of banana bread, the twins wanted to use the Super Fruit Greek flavor in it.  It gives it a subtle berry flavor...the girls said it gave them "Super Girl powers".  I also used coconut oil and pumpkin instead of butter to lighten it up.  This recipe is very versatile, you can add whatever flavor Greek Yogurt you want.  The Black Cherry would be ah-mazing with some mini chips!

Here's what you need:
  •  1 cup sugar
  • 1/2 cup pumpkin puree
  • 1/4 cup coconut oil
  • 2 eggs (or 1/2 cup Egg Beaters)
  • 1 teaspoon vanilla extract
  • 1.5 cups flour
  • 1/2 cup oatmeal
  • 1/4 cup flax seed (optional)
  • 1 teaspoon baking soda
  • 1/2 teaspoon salt
  • 1 teaspoon cinnamon
  • 1 (6 oz) Stonyfield Super Fruit Greek yogurt cup
  • 2-3 brown bananas, sliced or mashed
  • Optional: raw sugar to sprinkle on top before baking
Let's Bake!
  1.  Preheat the oven to 350.
  2. In a mixer, combine sugar, pumpkin and coconut oil. Add eggs, one at a time, then vanilla.
  3. In a small bowl (I use an old quart yogurt container!), add flour, oatmeal, flax, baking soda, salt and cinnamon. Stir together and slowly add to wet ingredients. 
  4. Add yogurt and bananas.  Mix together for about 1 minute.
  5. Pour into 1 bread pan or 4 mini loaf pans.  Bake for 45-60 minutes.  It depends on your oven! For a crunchy top, sprinkle with raw sugar before baking!
Super Fruity Banana Bread

What's your go-to yogurt flavor? Do you enjoy Greek or plain?

Getting Jiggly With It: Halloween JELL-O Fun!

October 18, 2013


Totally patting myself on the back for that post title...gotta love a little Will Smith reference.

Can you get the song out of your head yet?  Me either.


Now that the twins are old enough to safely be in the kitchen with me, I let them help me as much as possible.  We use kid friendly knives (I found this great plastic pizza roller which works perfectly for helping slice peppers and lettuce) and let them measure with cups and spoons.  Great learning experience too!

(I guess I should say Olivia helps me, Maddie gets bored about 2 minutes into the project and magically returns when there is a spoon to lick or a hot ooey gooey cookie to taste.)

A perfect kid friendly snack is JELL-O!  Our go-to dessert is banana pudding with Cool Whip on top. 

Since our house is fully decorated with spooky Halloween decorations, I decided it's time to make some tasty snacks.  The girls' preschool is peanut free, so JELL-O treats are perfect to bring for a treat.

We started with a simple JELL-O Halloween molds, which even I was excited about.  Something about JELL-O brings out the kid in everyone.  Obviously, the kids can't pour the boiling water, but they helped stir!  The only hard part is waiting 3 hours for them to set!

CONFESSION #1: We ended up making these after dinner, so we had JIGGLERS for breakfast the next day.  Totally got "Cool Mom" points for the day.  Whew!

Can you tell Gabby was "brushing" Maddie's hair in her salon?

Once we mastered the JIGGLERS, we were on to our next project.  We saw an awesome MMMMonster recipe on the JELL-O website that we HAD to try. 

Aren't those MMMMonsters adorable?

Since we had Orange and Lime flavors, we decided to make pumpkins.  Note for parents: this project is more for older kiddos.  The girls helped me pour the layers of JELL-O, but the pumpkins didn't quite turn out for us (toddlers don't have much patience to wait for each layer to set).  Next time, I'll make them alone.  Our plan was to make faces on them, like shown above.

CONFESSION #2: While making these in the little shot glasses, I was totally trying to figure out how to make these into adult JELL-O shots.  Hehe. 

The JELL-O website has so many cute ideas! 

I really want to try these spooky spiders!

We love Monsters Inc!
The girls' preschool party isn't for a few weeks and we have so many spooky ideas now!


What do you like to make with JELL-O?
I was selected for this opportunity as a member of Clever Girls Collective and the content and opinions expressed here are all my own.

Quick and easy ABC soup

September 22, 2012

Sorry I've been a bit MIA lately!  It's been kind of crazy around here.   The twins have started some new activities (playgroup, gymnastics) and I feel like we are running around non-stop.  I like keeping them busy, otherwise we get too stir crazy!  Gabby is also walking now....eek!

I have my first blogging conference next week, which I have been preparing for.  Cannot wait to meet some new people and do some networking for this little old blog I have here!

Also, we've all been sick!  I'm not sure if it's just a bug going around or something stemming from our allergies.  It hasn't been fun! I can't even wear my contacts anymore.

When you aren't feeling well, there is nothing better than a bowl of hot chicken noodle soup.  Growing up, I always had Mrs. Grass' soup.  How can you not love a soup that gives you that fun little broth nugget to toss in?

For some reason, the girls don't really like canned or boxed soup.  I guess it's good they like my cooking!  This time of year, I make sure to whip up a batch or two of soup to put in the freezer.

Our new favorite?  Chicken ABC soup.  Yummy and they are learning while they slurp.

Best part?  Super quick and easy!


Here's what you need:

Let's make some soup!
  1. Heat a tablespoon of olive oil in a soup pot. Add veggies to a large soup pot and cook until tender (3-5 minutes).
  2. Add entire box of stock and noodles.  Bring to a boil.
  3. Once boiling, add chicken tenders whole.  I like to poach them in the liquid to cook, then shred later.  You can chop beforehand, also.
  4. Cook 15-20 minutes! 
I like to freeze in 1 cup portions for when needed!  Yes, it takes a bit longer than just opening up a can of soup, but it tastes 100 times better!


What is your favorite soup recipe?


Fill 'em up Banana Bread

August 30, 2012


This summer I have been experimenting with a bit of freezer cooking.  One thing we always like to have on hand for a quick snack is bread.  I saw this recipe for a banana bread on my fellow blogger friend's site (Mrs. Weber's Neighborhood).  I have been searching for a great recipe that isn't too mushy or dry and this one is perfect!  It freezes so well, we usually make 3 loaves at a time.

I have made it a few times and this time I changed it up.  I know, I know...why mess with something good?  Here's why:  I have little toddlers that can throw down some food.  Not quite where it all goes, but their appetite is the main reason it is absolutely necessary for us to shop at Costco.  I am lucky they like to eat healthy foods, at least!  My new trick is I have been adding flax and other forms of fiber to anything I can: smoothies, pancakes, etc.  It fills up their bellies!  Just be careful at first...haha.

So here it is, my crazy fill 'em up banana bread.  It has extra protein (Greek yogurt) and fiber from the flax and oatmeal, yet you can't tell at all!  This is a perfect way to use up markdown bananas in your freezer.

Thank you, Lauren, for the inspiration!

Ingredients
  • 1/2 cup butter, melted
  • 1 cup sugar
  • 1/2 cup of Egg beaters (or 2 eggs)
  • 1 teaspoon of vanilla
  • 1.5 cups flour 
  • 1/2 cup plain oatmeal
  • 1/4 cup ground flax 
  • 1 teaspoon baking soda
  • 1/2 teaspoon salt
  • 1/2 cup plain 0% Greek yogurt
  •  2-3 bananas
Mix it up!
  1. Preheat oven to 350
  2. With a mixer (or by hand in a bowl), combine the butter and sugar.
  3. Add egg beaters and vanilla.  Mix until combined completely.
  4. In a small bowl add flour, salt, soda, oatmeal and flax.  Mix it up with a spoon ans slowly add to big bowl.  Mix for a minute or so to combine.
  5.  Add yogurt and bananas.  
  6. Pour into a bread pan (or cupcake tin!) and bake for 50-60 minutes.  I always cook it a bit longer than expected to get the center cooked.  It won't burn, it adds a great crust to the bread.

Enjoy! 
 

Mmmm Mondays! Go-to granola

August 06, 2012


We love oatmeal in this family.  Nothing better is a warm bowl of maple brown sugar oatmeal for breakfast...in the winter.  During the summer it's too hot for it!  This summer we have been hooked on granola.  We make parfaits, put it on our frozen yogurt or just add it to our fruit salads. 

Only bad thing?  We were buying it.  I don't know why I didn't think to make it before now, but I just assumed buying it would be cheaper. 

I saw this great recipe and I knew I could add our favorite ingredients to make it just like the stuff we buy.  Plus this is a great kid-friendly cooking recipe.  Olivia is my kitchen helper and she loved to measure out everything for me.

Here's what you need for our Nutty Coconut Cranberry granola:
  • 4.5 cups of old-fashioned oats, uncooked
  • 1/3 cup sliced almonds
  • 1/3 cup chopped pecans
  • 1/3 cup shredded coconut
  • 2 teaspoons cinnamon
  • 1/2 teaspoon salt
  • 1/4 cup maple syrup
  • 1/4 cup apple juice
  • 1 tablespoon canola (or vegetable) oil
  • 1/2 cup craisins
Once you have all of these ingredients on hand, it will be easy to whip up a batch.  Also, you can add and subtract whatever you like!  I love the versatility of granola.

  1. Preheat the oven to 350.  Line a cookie sheet with parchment paper.
  2. Combine oats, nuts, coconut, cinnamon and salt in a big bowl.
  3. In a smaller bowl, whisk: syrup, juice and canola.  Add to big bowl and mix well.
  4. Pour onto cookie sheet and spread evenly.
  5. Cook for 20-25 minutes until toasted.  Add craisins and store in an air-tight container.
Enjoy!


Breakfast fun for the kids!

July 02, 2012


Tonight was one of those nights where I had no ideas for dinner.  When that happens, it's brinner time!  AKA: breakfast for dinner, if you didn't watch Scrubs.  Shame on you, by the way!  It was an amazing show!

I realized that we were out of pancake mix, so I came up with a new idea for the ladies.  When I was in college, my roommate Kim made these eggs she called "bird's nests" and they were so amazing.  You get toast and eggs in one pop! 

This is a great meal to have your kids help with! 

Here's what you need (pretty self explanatory...):
  • Bread
  • Eggs
  • Butter
  • Cookie cutter
    • Keep the shape simple.  We tried a hand and it was a mess.
 Simple steps
  1. Butter the toast on both sides
  2. Cut a shape out of the middle with a cookie cutter.  
  3. Add both to a pan over medium-high heat.  Make sure to spray it!
  4. Crack an egg in the middle of the toast.  Season with S + P.
  5. Flip after 2-3 minutes
Voila!  We use the shape to dip.  The girls love some dippy eggs right now!


What's your favorite brinner meal?

Quick tip: how to save on yogurt cups

May 30, 2012


I don't know if your kids are as crazy as mine, but the twins like to have their food compartmentalized.  I was buying those "kid friendly" yogurt cups for a while and I stopped one day and thought about how much money I was wasting.  Per ounce, it is MUCH cheaper to buy the big tubs. Did you know that the shelf price tag for any food item will tell you the price per ounce?  I love it!

Unless there is a crazy deal on the cups with coupons, I will only buy the 32 oz tubs now.  We can go through 2-3 per week!

I just saved a few cups from other snacks and now I use those.  The snack cups fit perfectly on plates and my crazy kids are happy!  One less battle...these days we have many.  Toddlers are quite opinionated!

Side note: we do this with a lot of other snacks as well.  We get large containers of applesauce from Costco, so the cups are perfect!  Also, buy boxes of Jell-O and pudding instead of the handy cups.  That can save you ton when you consider the cups are $2.50+ for 6 and the $0.59 box makes at least 8!


Mmmm Mondays: How to make perfect chicken tenders

June 20, 2011


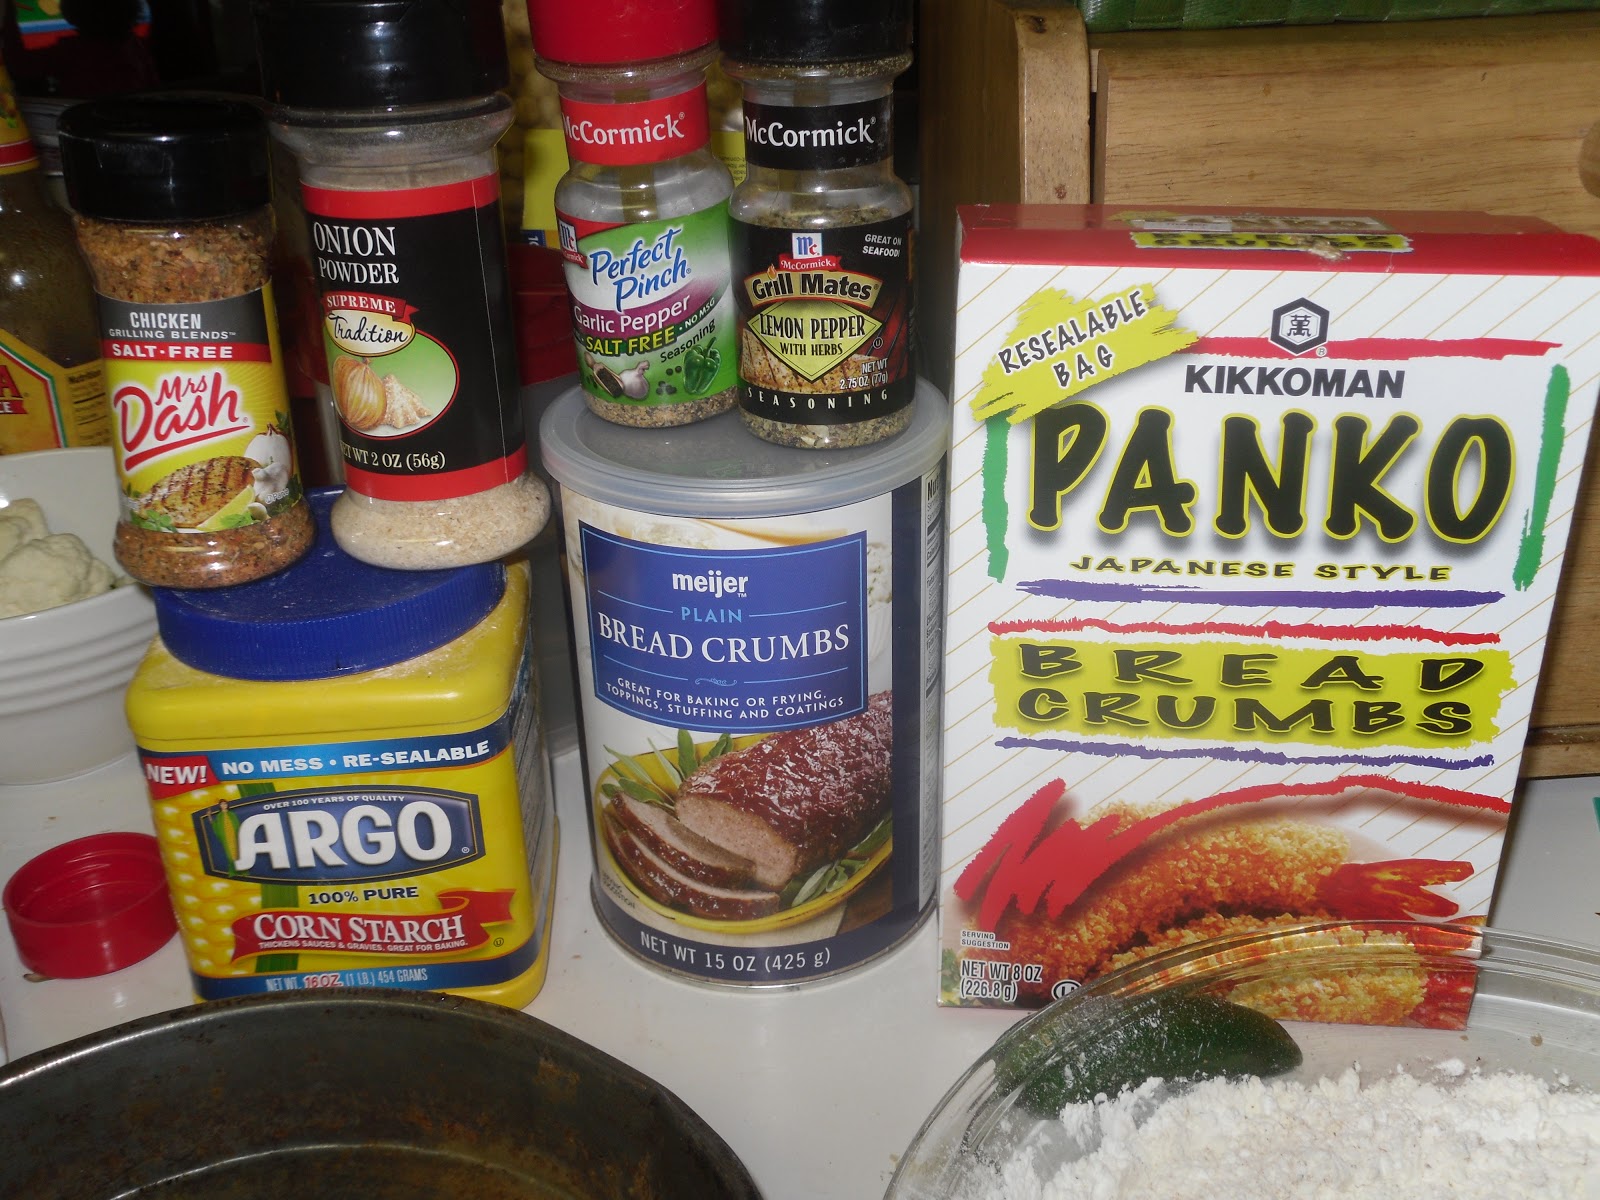
We love chicken tenders around here.  Especially with some mashed potatoes or sweet potato fries.  Over the years, I have tried many recipes to get the perfect tenders.  My two secret ingredients for perfectly crispy tenders: panko bread crumbs and corn starch.  Panko is sold at every grocery store (by the regular bread crumbs) and they make any breading amazing.   I also use them for eggplant or chicken Parmesan.  As far as seasoning goes, you can add whatever you like.  For the girls, I use milder seasonings like seasoned salt and lemon pepper.  For the "grown-up" batch, I add cayenne pepper and hot sauce. As I advise for any cooking, play around with spices and see what you like!  Here's my recipe to get you started!


Ingredients:
  • 1.5 lbs of chicken tenders (or breasts, sliced into thin strips)
  • You need 3 pans (I like to use pie/cake pans or deep plates)
    • #1: Flour mixture: 1 cup flour, 1/2 cup corn starch and season with 1 teaspoon each of: seasoned salt, garlic powder or pepper, onion salt and chicken grill seasoning.  It seems like a lot, but it doesn't all stay on the chicken.
    • #2 Egg mixture:  3 eggs, a dash of hot sauce and 1-2 tablespoons of milk.  You can also add 1/4 cup of ranch for extra flavor.
    • #3 Breading:  1.5 cups of bread crumbs and 1.5-2 cups of Panko.  If you cannot find Panko, cracker crumbs work great too.
  • 1/4-1/2 cup of canola oil for shallow frying


Directions:


Here's what your 3 dishes should look like.  I do an assembly line style technique to bread my tenders. 
  1. See photo above.  To bread the tenders, season them with salt and pepper first.  Before you start breading, add enough oil to cover the bottom of your pan and heat on medium heat.  Get out a cookie sheet and place a cooking rack on top.  I place finished tenders on there and keep warm at 250 in the oven.
  2. As oil is heating, start the breading process.  I usually put 3 to 4 tenders in each batch. Toss in flour mixture, then egg mixture and finish with breading mixture.  Place tender in pan.
    • Note:  As one batch is cooking, start breading the next batch.
  3. The tender should cook about 3-4 minutes on each side.  Once it is golden brown, place on pan in oven.
  4. Repeat until all tenders are breaded.  I like to season my finished tenders with parsley.
  5. Serve with favorite sides and don't forget dipping sauce.  Honey mustard and BBQ are favorites around here!  To reheat, I find it's best to use the oven.


It seems time consuming at first, but once you make them a few times it really is a quick and easy meal.  I make sure I have the potatoes boiling before I start the tenders and I can steam a veggie at the same time.

How do you make chicken tenders?  What dipping sauce is a must in your house?
 
FREE BLOGGER TEMPLATE BY DESIGNER BLOGS